
The Traction Rec integration automatically copies eligible child registrations into the correct UpBup site and begins the enrollment-forms process. This article explains how to give an administrator access to the integration, configure program connections, monitor child records, and resolve issues that prevent a child from being added to UpBup.
1. Grant an administrator Integration Access
An administrator must have Integration Access enabled before they can view or manage the Traction Rec integration.
A Super Admin can grant access by following these steps:
- Select Admin/Staff from the Mode dropdown menu.
- Open the ADMINS dashboard.
- Locate the administrator and select EDIT.
- Under the administrator’s Access Items, enable Integration Access.
- Select UPDATE to save the change.
The same permission can be enabled while creating a new administrator account.
For complete instructions on creating or editing an administrator and managing Access Items, see Add & Invite New Admin to a Provider Site.
Once Integration Access is enabled, the administrator can use:
- The CONFIGURATION dashboard
- The Program Roster report under REPORTS
2. How the nightly Traction Rec sync works
Children are initially registered for programs in Traction Rec. UpBup then processes eligible registrations through an automatic nightly sync.
During the nightly sync:
- UpBup checks the Traction Rec programs, courses, sessions, and options connected to the selected UpBup site.
- A child who is not already Active in the corresponding UpBup program is cloned, or copied, into UpBup.
- UpBup automatically requests the child’s enrollment forms packet.
- If the child already exists in UpBup but has an inactive status, the child is changed to Enrolling.
- If required information is missing or invalid in Traction Rec, the child is not cloned until the conflict is corrected.
The enrollment request starts the same family-facing forms process described in Requesting Enrollment Forms Packet.
Important:
New child records are processed nightly. The Program Roster report provides a current view of integration results, but correcting a record in Traction Rec does not necessarily cause the child to appear in UpBup immediately. The corrected record will be eligible for a subsequent nightly sync.
3. Run a Manual Sync from the Children Dashboard
Administrators do not have to wait for the nightly sync. A manual Traction Rec sync can be started at any time from the CHILDREN dashboard.
This is useful when:
- A child was recently added to Traction Rec
- A blocking conflict was corrected in Traction Rec
- Enrollment forms need to be requested before the next nightly sync
- An administrator wants to confirm whether a child has already been cloned
- An administrator wants to review the roster for a specific program
Open the Manual Sync
- Confirm that the correct UpBup site is selected.
- Open the CHILDREN dashboard.
- Select ADD FROM TRACTION REC.

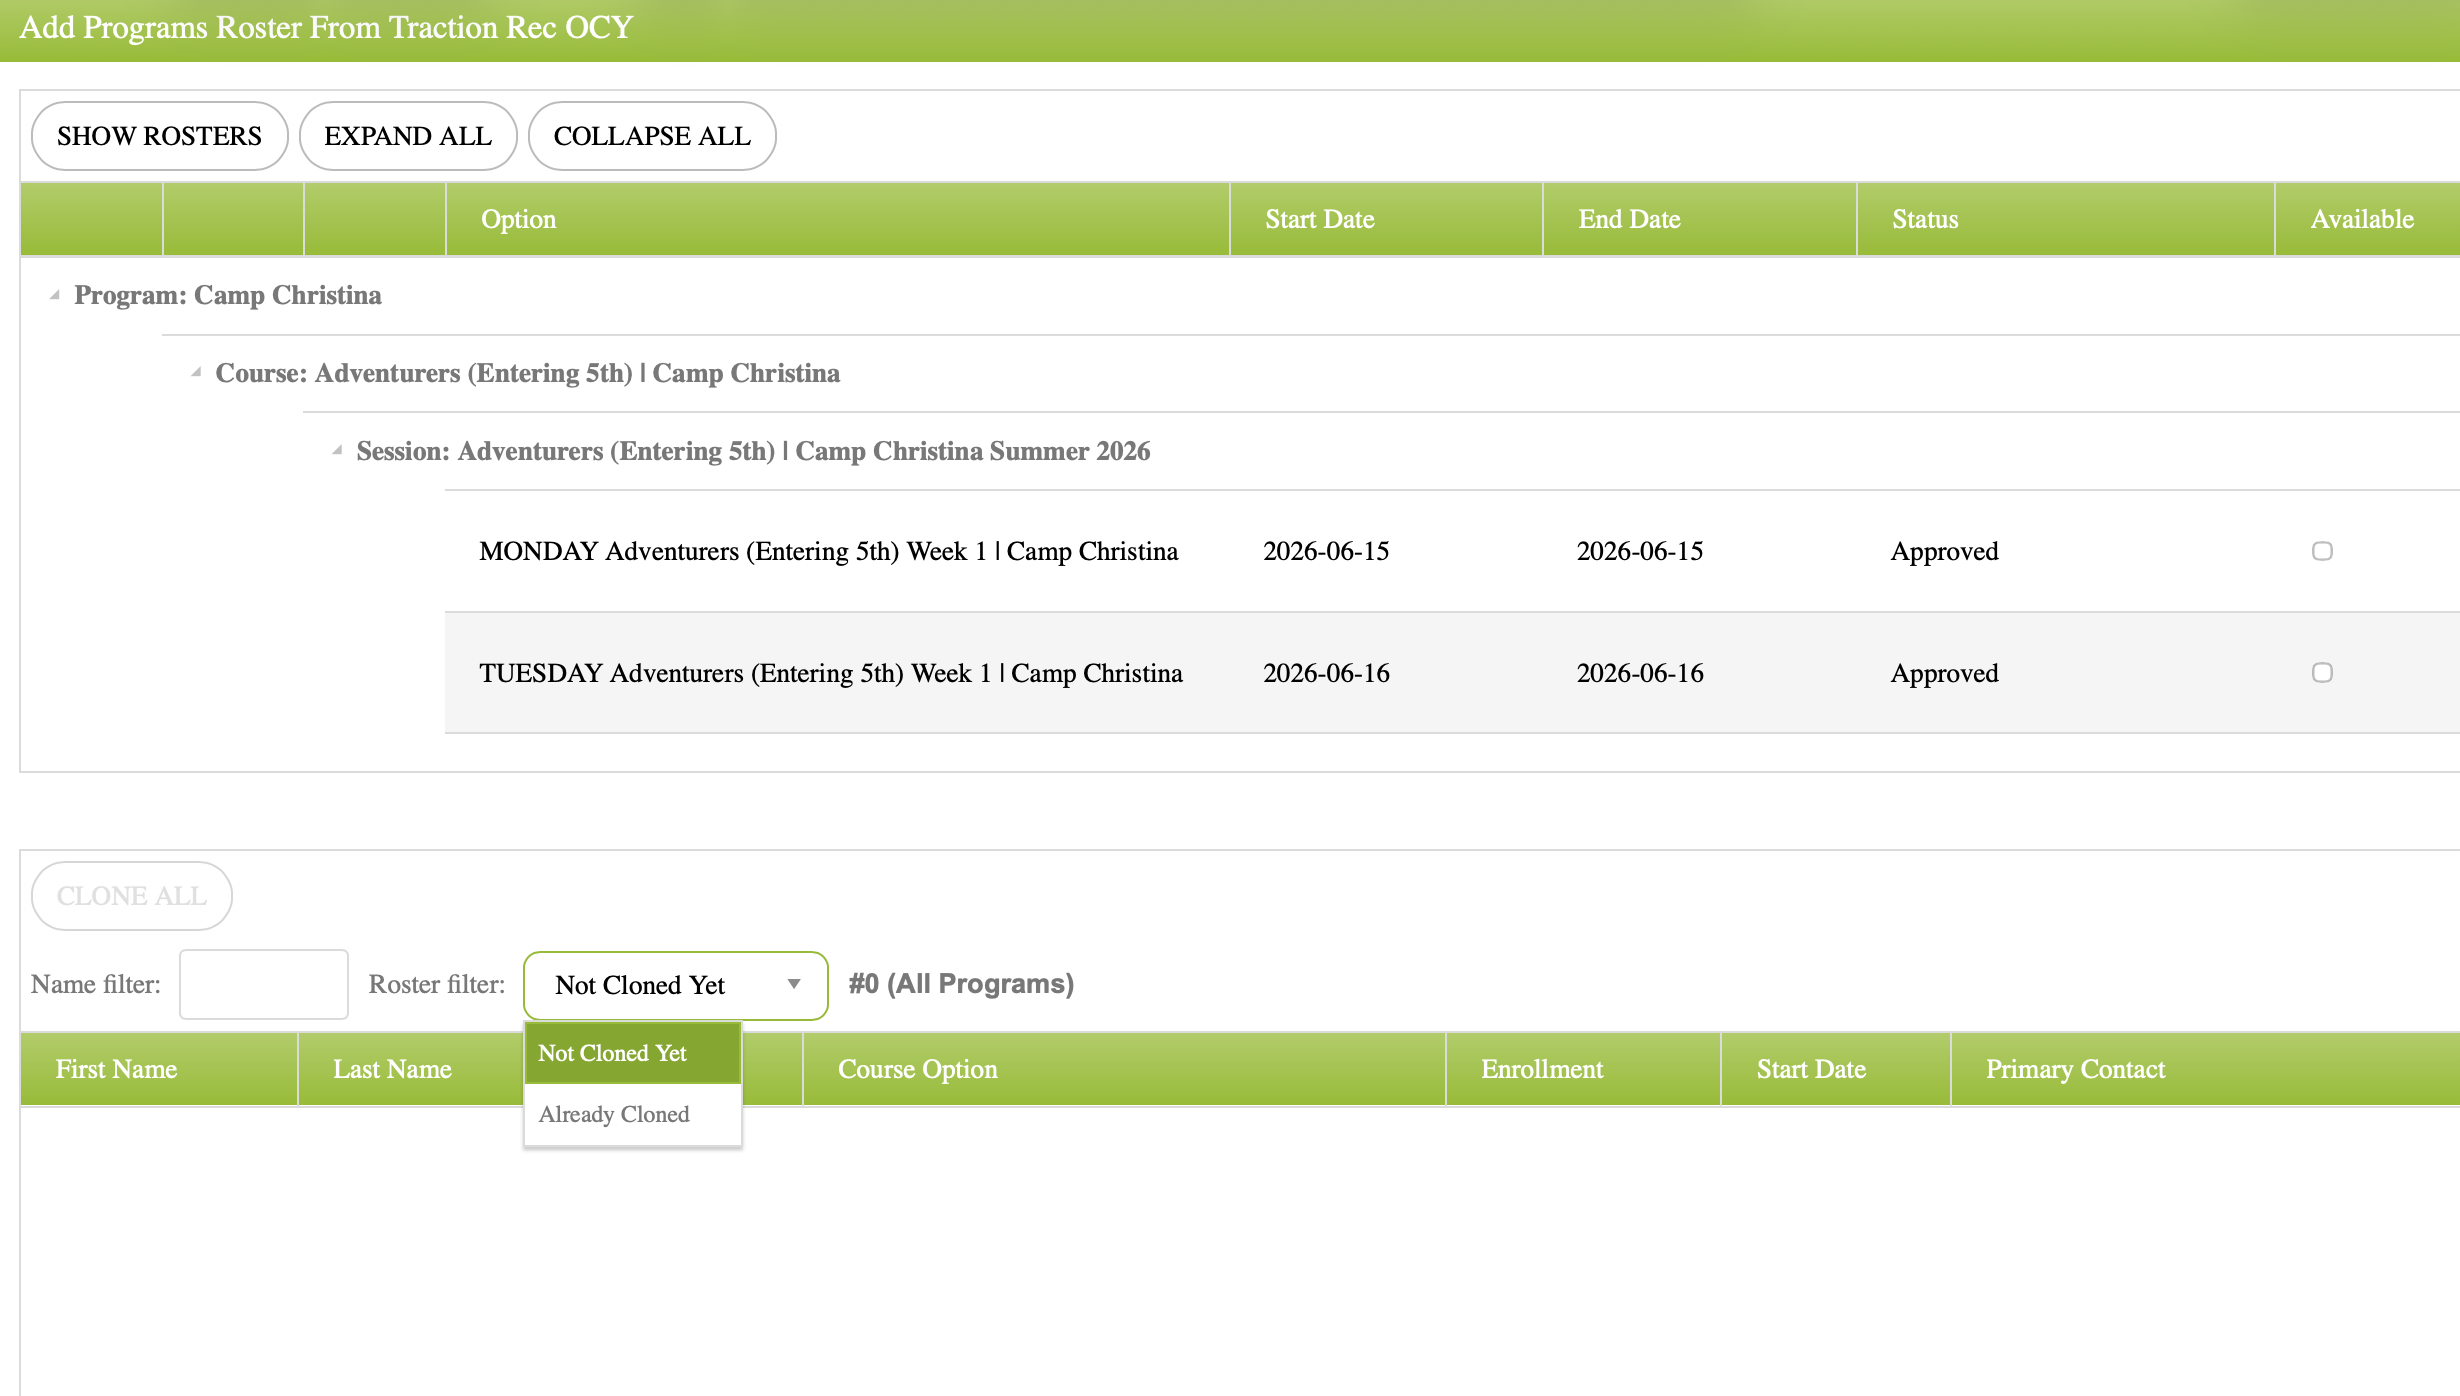
The manual sync page displays the available Traction Rec hierarchy:
Program → Course → Session → Option
Expand the hierarchy to locate the appropriate program, course, session, and option.
Manual Sync Controls
| Button or control | What it does |
| SHOW ROSTERS | Loads the child roster for the selected Traction Rec program options. |
| EXPAND ALL | Opens every Program, Course, and Session level so all options can be reviewed. |
| COLLAPSE ALL | Closes the expanded levels and returns the list to a condensed view. |
| Name filter | Filters the displayed roster by the child’s name. |
| Roster filter: Not Cloned Yet | Shows children in the selected Traction Rec roster who have not yet been cloned into the corresponding UpBup program. |
| Roster filter: Already Cloned | Shows children who have already been cloned into UpBup for the selected program. |
| CLONE ALL | Manually clones the eligible children displayed in the roster into UpBup. The button becomes available when there are eligible records to clone. |
Manually Clone Children
- Expand the Program, Course, and Session levels.
- Locate the relevant Traction Rec program option.
- Select SHOW ROSTERS.
- Set the Roster filter to Not Cloned Yet.
- Review the children displayed in the roster.
- Use the Name filter when you need to locate a specific child.
- Select CLONE ALL to clone the eligible children shown in the roster.
After the manual clone, switch the Roster filter to Already Cloned to confirm that the children were added to UpBup.
The manual process follows the same general rules as the nightly integration:
- The child is copied from Traction Rec into UpBup.
- Enrollment forms are requested.
- An inactive child is changed to Enrolling.
- Records with blocking conflicts cannot be successfully cloned until the source information is corrected in Traction Rec.
- A child who has already been cloned into the program will appear under Already Cloned rather than being duplicated.
4. Use the Configuration dashboard
The CONFIGURATION dashboard determines which Traction Rec programs, courses, sessions, and options are connected to each UpBup site.
Before making changes, confirm that the correct UpBup site is selected in the provider or site dropdown at the top of the page. Configuration changes apply to the selected site.
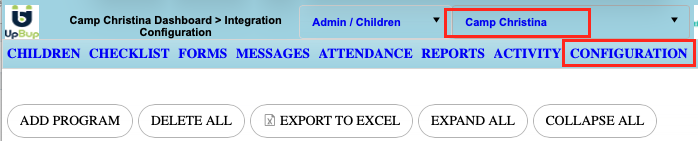
The dashboard organizes records in the following hierarchy:
Program → Course → Session → Option
Select the arrow next to a Program, Course, or Session to expand or collapse that individual level. The rows beneath each session show details such as the option name, start date, end date, status, availability, and available actions.
Configuration dashboard controls
| Control | What it does |
|---|---|
| ADD PROGRAM | Adds another Traction Rec program to the selected UpBup site’s integration configuration. |
| DELETE ALL | Deletes all configuration entries listed for the selected site. Use this option carefully. |
| EXPORT TO EXCEL | Exports the current configuration list to an Excel file. |
| EXPAND ALL | Opens every Program, Course, and Session level so that all configured options are visible. |
| COLLAPSE ALL | Closes the expanded levels and returns the dashboard to a condensed view. |
| Available checkbox | Indicates whether an individual option is marked as available for the integration. A check mark means the option is currently marked available. |
| DELETE | Deletes only the individual configuration entry shown on that row. |
Use the displayed Start Date, End Date, and Status to confirm that you are configuring the correct Traction Rec offering.
5. Monitor children with the Program Roster report
The Program Roster report is available from the regular REPORTS dashboard.
To open it:
- Select the correct UpBup site.
- Open the REPORTS dashboard.
- Select the Program Roster report.
For general information about accessing and using UpBup reports, see Reports.
The Program Roster report provides a current view of Traction Rec integration activity. Use it to determine:
- Which Traction Rec children have been successfully cloned into UpBup
- Which children are waiting to be processed
- Whether a blocking conflict is preventing a child from being cloned
- What source information may need to be corrected
For example, a child may be blocked when the Traction Rec record does not contain a guardian email address. When a conflict appears:
- Review the issue shown in the Program Roster report.
- Open the child or household record in Traction Rec.
- Correct the missing or invalid information in Traction Rec.
- Allow the corrected record to be processed during a subsequent nightly sync, or create a manual sync.
- Return to the Program Roster report to confirm that the child was successfully cloned
6. Child statuses and regular UpBup reports
When the integration finds an existing child who is inactive in UpBup, the child is changed to Enrolling.
An administrator may change a child’s status at any time. Statuses can be changed for one child or for multiple children by following Changing STATUS on a single child or multiple children.
Only children with an Active status appear in regular UpBup reports. The Program Roster report is the exception and should be used to monitor integration records, including children who have not yet become Active.
Therefore:
- A child may appear in the Program Roster but not in another UpBup report while the child is Enrolling or otherwise inactive.
- If a child is missing from a regular report, check the child’s UpBup status before assuming that the integration failed.
- Change the child to Active only when that status is appropriate for your program.
Troubleshooting
| Issue | What to check |
|---|---|
| The administrator cannot see the CONFIGURATION dashboard or Program Roster report. | Confirm that Integration Access is enabled on the administrator’s account. |
| A Traction Rec child has not appeared in UpBup. | Confirm that the correct site and program options are configured, then check the Program Roster report for a blocking conflict. |
| The Program Roster shows a missing guardian email or another source-data conflict. | Correct the information in Traction Rec and allow the record to be processed during a subsequent nightly sync. |
| A child appears in the Program Roster but not in another UpBup report. | Check the child’s status. Regular reports display only Active children. |
| An inactive child was brought back into the enrollment process. | The integration may change an inactive child to Enrolling. An administrator can update the status when appropriate. |